What is Microsoft Syntex – SharePoint Advancement Management?
SAM has been introduced as a new set of security and content management capabilities that are designed to simplify the lives of SharePoint admins, specifically when dealing with site sprawl and oversharing of sensitive content. It does this by focusing on two major areas:
- Advanced access policies
- Content lifecycle management
If you've ever dealt with a SharePoint Online environment plagued by site spawl and oversharing, it's likely that alarm bells are already ringing in your mind, questioning whether conditional access policies, group expiration, and access reviews in Microsoft Entra and Purview don’t already do exactly this job.
To some extent, they do, but SAM empowers SharePoint administrators to enhance your organization's security stance and content management with SharePoint-specific controls.
In this article, we’re going to explore how to secure SharePoint document libraries by detailing a scenario that this can be applied to.
Requirements
There are a few boxes which need to be checked before we can secure SharePoint document libraries:
- Sensitivity labels – SAM makes use of sensitivity labels so any labels you plan on using will need to be created, published, and made available to the users who will be selecting the default sensitivity label for a SharePoint library.
- SharePoint & OneDrive need to be enabled for sensitivity labels – If you have a relatively new tenant, this will be automatically enabled but if you’re not sure, you can check the status of your tenant by running the following command once logged into the SharePoint Online Management Shell:
(Get-SPOTenant).EnableAIPIntegration
- SharePoint Information Rights Management (IRM) needs to be disabled – IRM is the legacy version of SAM and if IRM is enabled on the library you’re targeting, you won’t be able to select a default label.
- Site Admin Permissions – To apply and or change sensitivity labels on the desired library, you will need to be a site admin.
Our example scenario – Policies and Procedures
With the technical requirements out of the way, let’s look at a potential scenario for when securing a SharePoint document library would be useful.
Every organization has a host of policies and procedures that employees are expected to adhere to. In our scenario, we have a centralized library that hosts all policies and procedures, accessible to the entire organization to view.
There are custodians from the various departments that manage these policies and procedures. The documents in the policies and procedures library, whilst available to the entire business, should not be shared with anyone external to the organization.
For this scenario, our objective is to ensure that all documents in the library automatically have a default sensitivity label with the minimum restrictions we have defined assigned.
Why is a default sensitivity label important?
Because it offers automatic labelling without content inspection and provides baseline protection without requiring users to apply labels themselves.
Step 1 – Create or select a sensitivity label
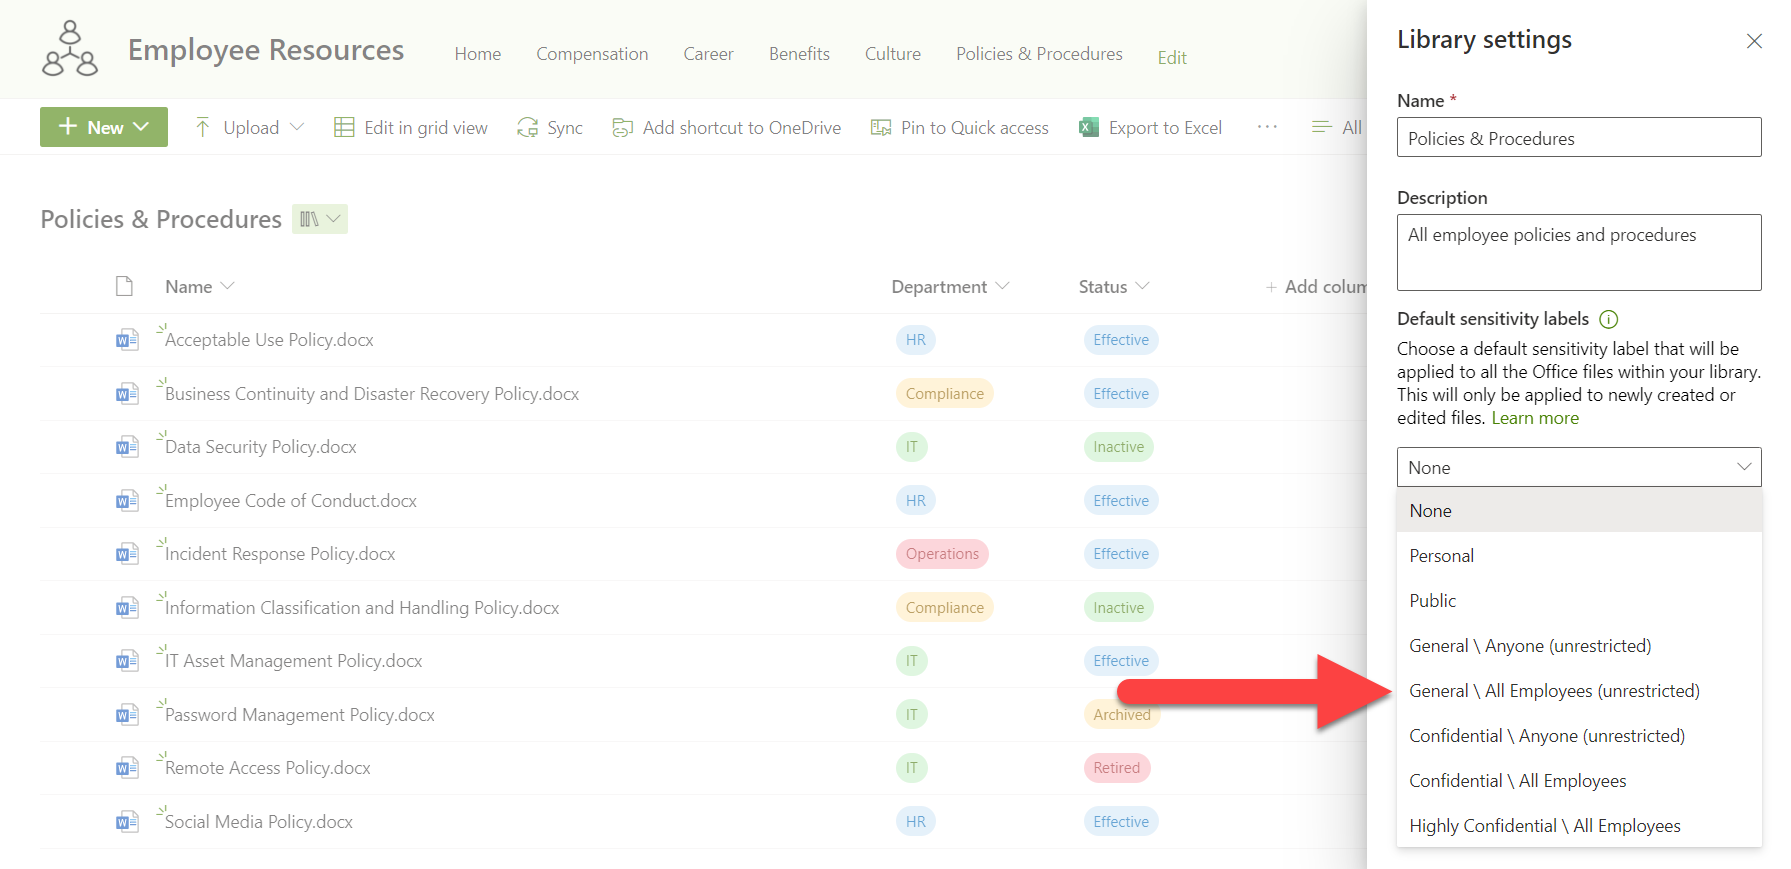
To achieve the objectives in our scenario, we will need an appropriate sensitivity label which aligns with our security needs. We can use one of the default sensitivity labels provisioned with the tenant or create a customized sensitivity label that meets our requirements. Luckily for us, in this scenario, there is a default sensitivity label that we can use:
General \All Employees (unrestricted)
This label is used for content that is not intended for public (external) consumption. In other words, content that you are privy to as an employee of the organization but should not share with anyone outside of your organization.
Read more: Create and publish sensitivity labels
Step 2 – Add a default sensitivity label to a SharePoint library
Now that we know which label we will be using, we can apply it to the policies and procedures library.
To do this, navigate to the library, go to the library settings, select the desired label and save:
What if the sensitivity label you need doesn’t show, or you don't have the option to select a label?
If your desired sensitivity label doesn’t show in the list of options, there are a few reasons as to why this may be the case:
- Sensitivity labels for Office files in SharePoint and OneDrive may not yet be enabled on your tenant. Learn how to enable this functionality or go to https://compliance.microsoft.com > Information protection > Labels. If you see the "Your organization has not turned on the ability to process content in Office online files that have encrypted sensitivity labels applied and are stored in OneDrive and SharePoint" message, select Turn on now and complete these steps.
- The label has not been published and/or made available to you to use.
- The label has been published and made available as required but the changes have not taken affect yet. It can take up to 24 hours for your label to be available for use.
Step 3 – Checking that the label has been applied
With the default sensitivity label set on your library, all new documents uploaded or created in the library (an also existing documents that are edited) will receive the new sensitivity label, except when an existing sensitivity label with a higher priority is already applied to the document.
For peace of mind, we want to check that each of the documents now have the correct sensitivity label applied but we don’t want to check them one-by-one. In our case, there are only a handful of documents, but this could easily be hundreds of documents.
To do this we’re going to adjust our view of the document library by adding the ‘Sensitivity’ column:
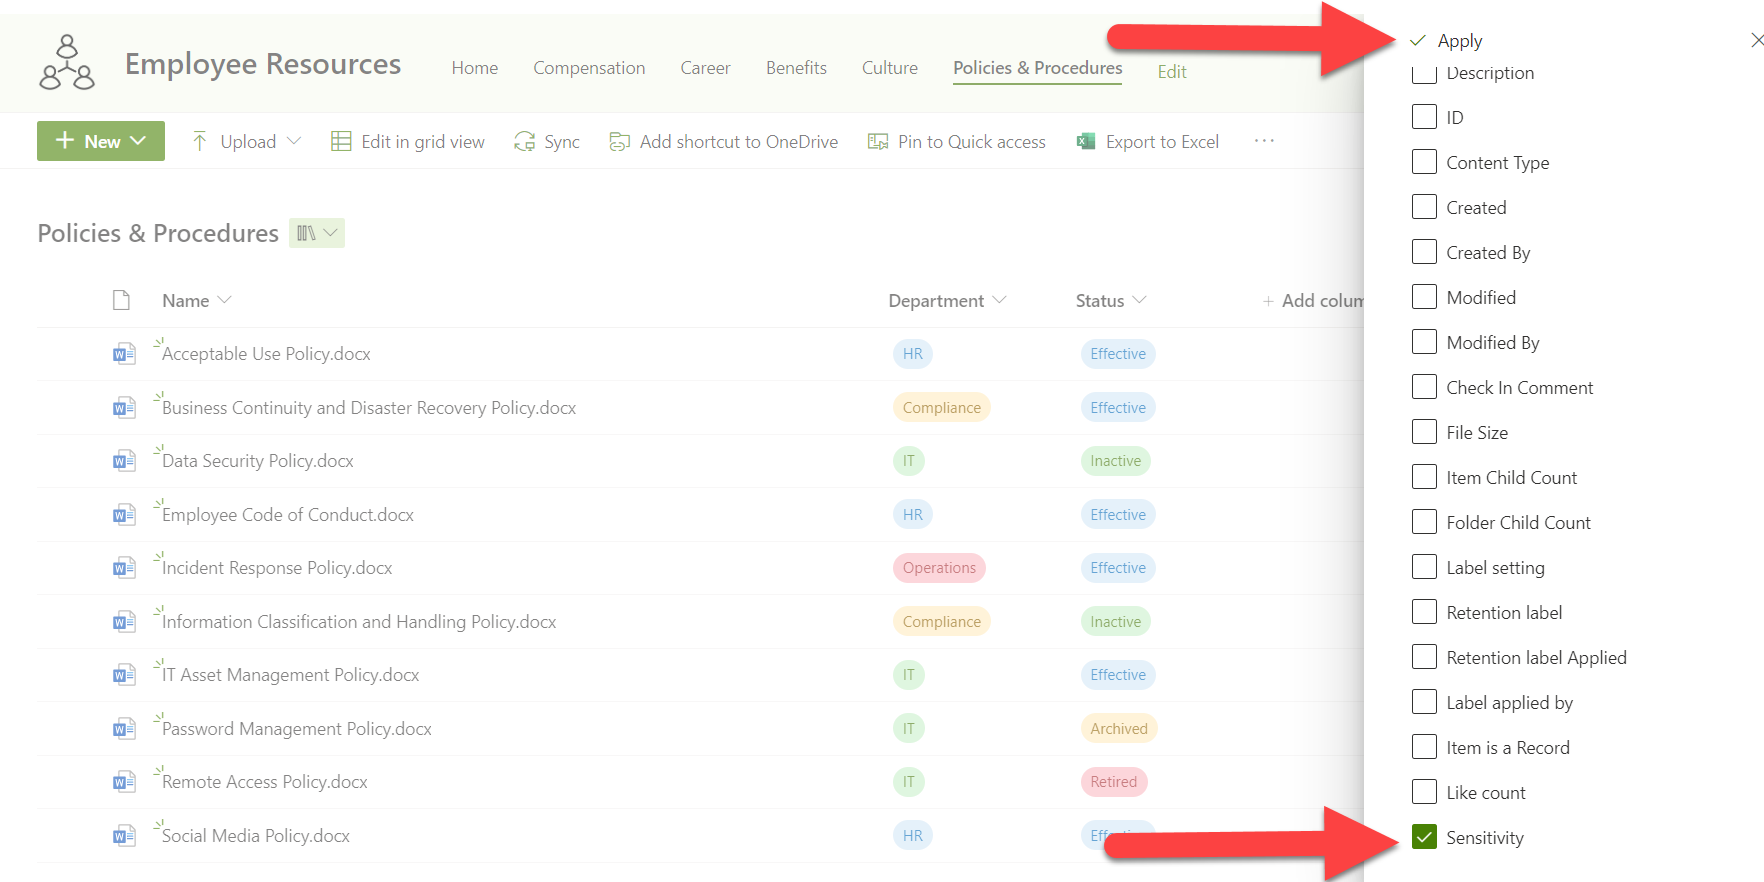
With this applied, we can easily see what labels have been applied to our documents and filter to check if there are any without, or with a different label applied:
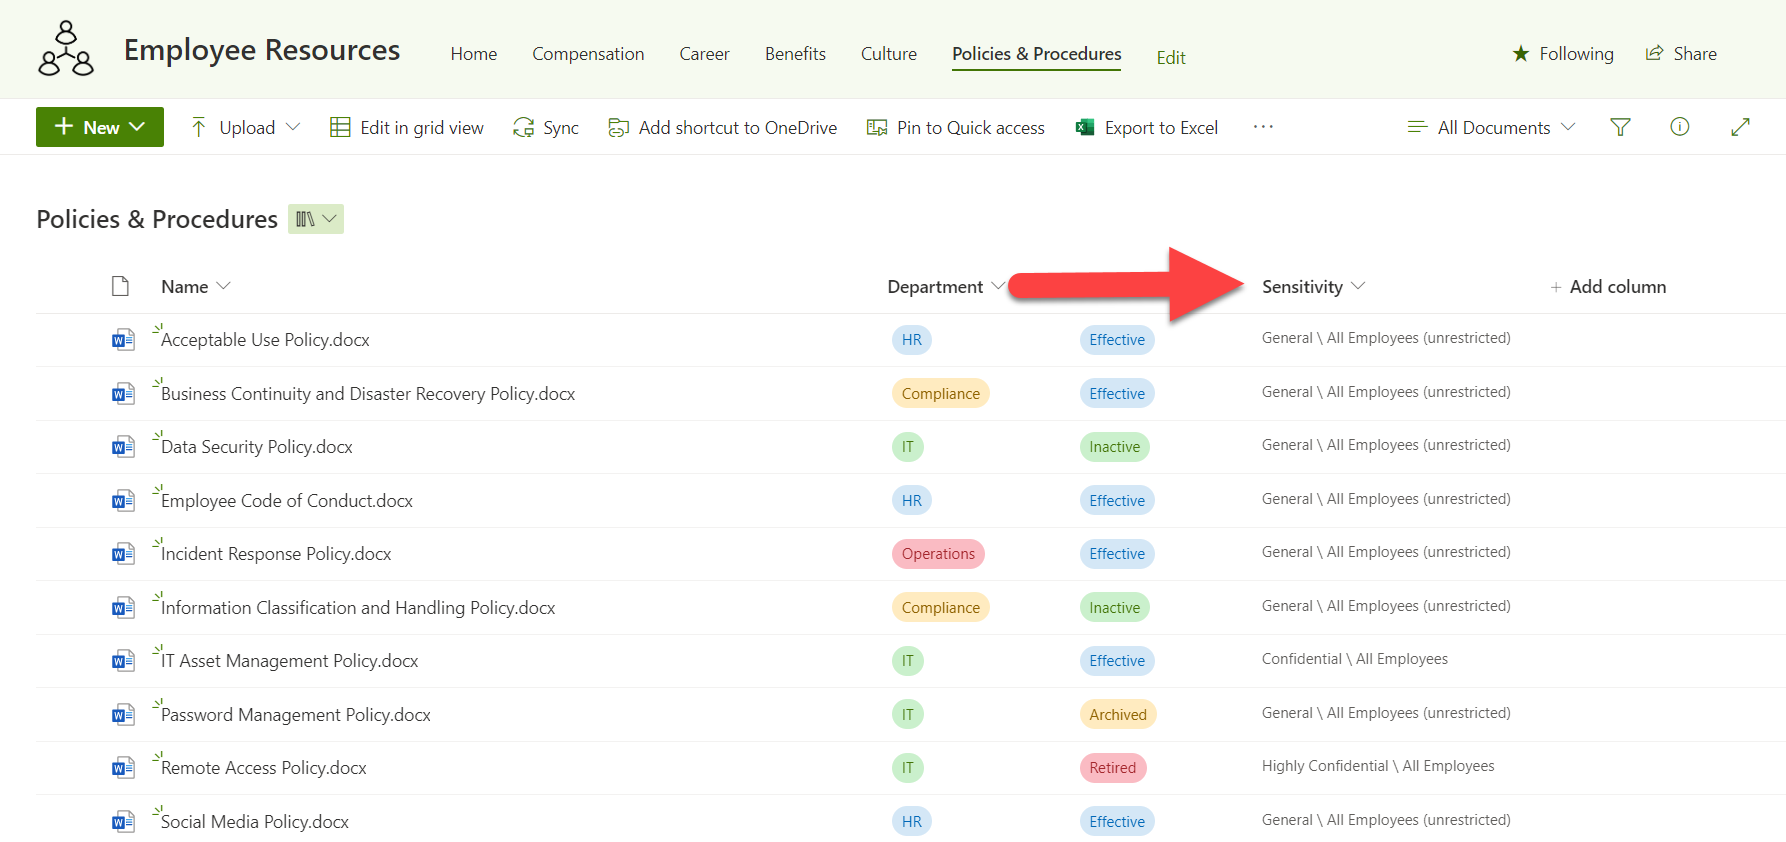
We can see in the above example that the ‘IT Asset Management Policy’ and the ‘Remote Access Policy' both have different labels applied to what the default of the library is set to. This is as a result of both of those documents having a higher-level priority sensitivity label applied to them.
Step 4 – Confirm that the label limits sharing
We can see the labels have been applied but do they perform the purpose we want to them to? To check this, we can try to share our Incident Response Policy with example@gmail.com, a user outside of our organization.
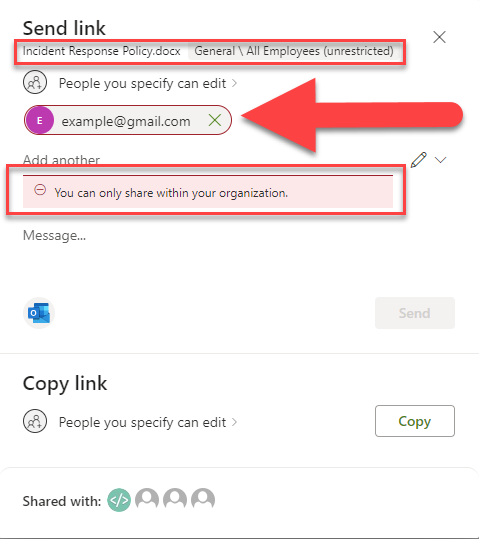
As you can see, I am being blocked from sharing the file with the sharing pop-up showing the warning that ‘You can only share within your organization.’
This means that the label is doing what we intended it to do and even limiting the Global Admin from mistakenly sharing out sensitive information.
Step 5 - Monitoring – Auditing
Viewing the sensitivity labels in the library in question gives us the peace of mind that our documents have been labelled, but when you’re dealing with large amounts of data over time, you may want to audit the impact of setting default labels.
To ensure that you are able to use the auditing feature, connect to the Exchange Online module in PowerShell and run the following command:
Get-AdminAuditLogConfig | Format-ListUnifiedAuditLogIngestionEnabled
If the result returns ‘False’ you can use the following to enable the unified audit log for your organization:
Set-AdminAuditLogConfig-UnifiedAuditLogIngestionEnabled $true
To perform this action, you will need to be assigned the Exchange Admin or Audit Log role in Exchange Online. To find out more about this, you can review this Microsoft Learn article.
In Microsoft Purview, go to the audit logs and configure your search parameters to search for ‘Applied sensitivity label to file’ under the ‘Activities’ section. Make sure to also to provide an appropriate start and end date for your search.

In our search parameters, we have specified the Employee Resources site where our policies and procedures have been hosted and given the search a name of ‘Employee Resources | Sensitivity Labels’. Once you hit search, the new audit will be queued up and, once completed, you will be able to open and review the results.

When reviewing the search results, open up the details pane of any of your items and scroll down to the SensitivityLabelEventData section and look for the ActionSourceDetails value. If this value is 6 it indicates that the sensitivity label was applied as a result of the library’s default sensitivity label.

Final Considerations
When dealing with any compliance implementations, it’s important to ensure that the correct information is targeted and that the users feel as little impact as possible when it comes to their ability to collaborate in their various capacities both internally and externally for your business. There is nothing worse than not being able to work due to a limitation that has been implemented incorrectly.
Planning
When planning to secure SharePoint document libraries, be sure to understand the sensitivity labels you want to implement, how this affects users' ability to work, and how this lines up with the business requirements.
Testing
Stepping through working with the sensitivity labels once they have been applied to a library and ensuring that the perform the intended function is critical. A great way to do this is to nominate a user in your organization that will be directly affected by this and have them give feedback of their experience. They will often pick up issues that the SharePoint admin may miss.
Education
Creating clear information regarding the sensitivity labels you choose and having that information readily available to the organization is critical. If people don’t understand why this is implemented and what it means, they are likely to find an alternative that could render your efforts null and void.
Labels upon labels
Less is more when it comes to the sensitivity labels that users have available to them. If there are too many sensitivity labels with only slightly different purposes, consider consolidating them, giving your users simple choices to make if the default sensitivity label doesn’t meet their requirements.