


Microsoft Lists provide teams with a centralized and versatile approach to manage information efficiently. Whether it's content scheduling or tracking issues, Microsoft offers prebuilt options that are effective and easy to use.
However, customizing lists to align with specific business requirements can be time-consuming. Once you've fine-tuned your ideal list, you may want to deploy it across your organization to standardize the way of working and providing consistent data capture. In such cases, Microsoft List templates are an ideal solution, enabling you to seamlessly implement your perfected list structure in multiple locations within your organization.
In this article, we will explore how to create, implement, and audience-target Microsoft List Templates. We won’t be covering how to edit and customize the lists themselves.
Our Scenario – Operations Department Asset Management
Microsoft has an existing template for asset management that we would like to customize and re-use whenever the Operations department starts a new project to keep track of the assets being used in that project.
Requirements
There are a few boxes which need to be checked before we can create a Microsoft List Template:
- Admin Rights – You will need to be a Global Admin or a SharePoint Admin on your tenant.
- Targeted Release – Creating custom list templates is currently only available in targeted release tenants, you can read more about this in the Microsoft documentation.
- SharePoint Online Management Shell – To create and manage list templates, you will need to install the SharePoint Online Management Shell
Step 1 – Design a list
As mentioned in our scenario, we will be using one of the default list templates provided by Microsoft to create a new list that we can then customize to our requirements. In this example, we have an existing site called Templates that we will be using to design our new list template.
Create the list using a template
On the Template site, create a new list and select the ‘Asset Manager’ template under the ‘From Microsoft’ tab and then create the list with the desired name and description.

Customize the columns
Now that we have our list, we want to customize it to our requirements. To do this, we’re going remove the ‘Manufacturer’ column and update the ‘Asset type’ column to include the assets our Operations department has available to them.
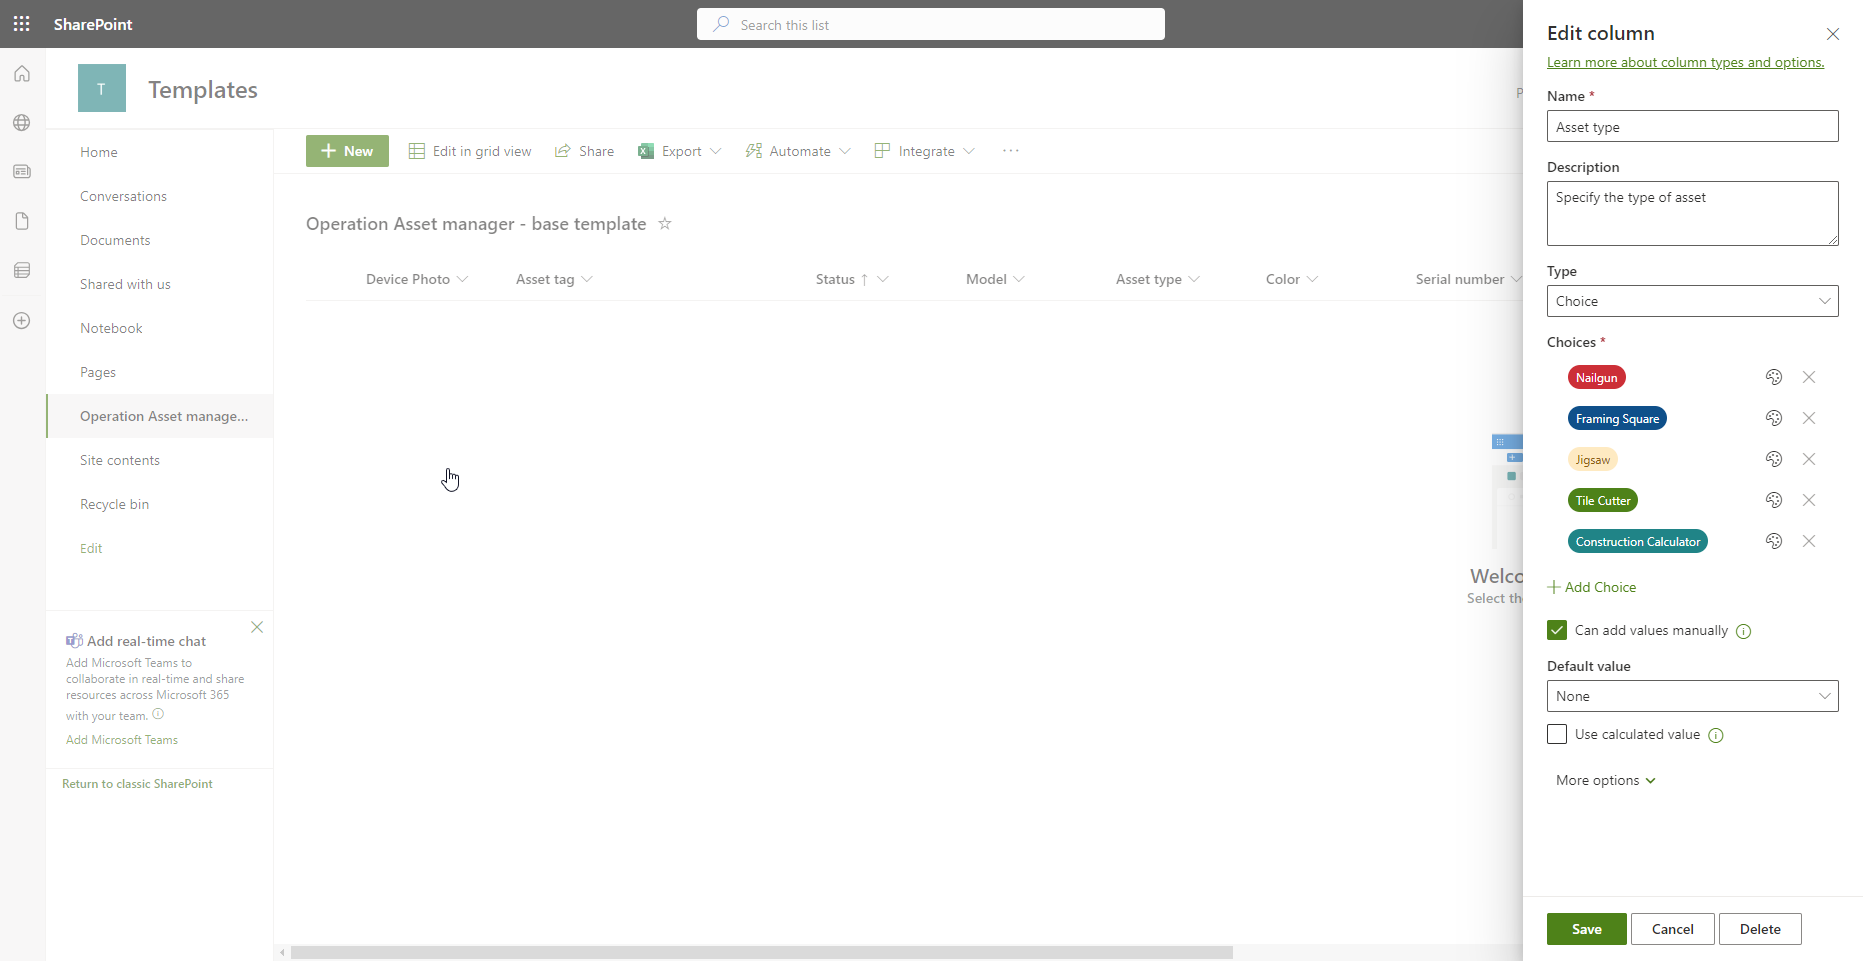
We now have our list designed in such a way that it will be relevant to the Operations department to use for each of their projects. The next step is to create a list template that they will be able to access when adding a new list to their Operations project site.
Step 2 – Create a list template
To create a list template in PowerShell is relatively straightforward, with 3 primary steps:
- Extract the list’s configuration
- Create a Site Script
- Create a List Design
Before we do that, make sure you are signed into the SharePoint Online Management module in PowerShell using your SharePoint Admin or Global Admin account. To do this, you can use the following command:
Connect-SPOService -Url "https://[tenant name]-admin.sharepoint.com"Extract the list’s configuration
Now that we’re signed in, we can extract our list’s configuration and store it in a variable:
$listConfig = Get-SPOSiteScriptFromList -ListUrl "https://[tenant-name].sharepoint.com/sites/Templates/Lists/[ListURL]"As we are writing the list configuration to a variable, we will not see any result on the screen, unless we have entered a property in the command incorrectly.
The information captured with the Get-SPOSiteScriptFromList command is fairly extensive as it captures the columns, list and column formatting, list views, and list details, including color, icon, name, and description.
If you wanted to, you could use the extracted list configuration and customize it further in JSON, but we recommend that all of this is done as we did in Step 1 – Design a list.
Creating a Site Script
Next, we will add a site script. This allows us to package the JSON of the list’s configuration into something that SharePoint will recognize as a list design or template. To do this, you can use the following PowerShell command:
Add-SPOSiteScript -Title "Operations Asset Management" -Description "Asset management list for Operations projects" -Content $listConfig
The title and description of the site script are important; if you are managing multiple site scripts, you want them to be easily identifiable and, if needed, make updates to the site script at a later stage.
Be sure to note the Id of the site script as we will be using this whilst creating the list design.
Creating the List Design
With everything nicely packaged in our site script, we will now create a list design. The terminology used by Microsoft is confusing as the list design is the thing that will show as a list template for our users.
Before you run the command, you may want to upload a thumbnail image to the site you designed your list on. This is the image that will show when your users are looking at which template they want to use when creating a new list. Microsoft doesn’t give any dimensions for this image, but you can follow the ratio of 2:1 (width : height).
You also may want to decide on a default color and icon for this list, these are the same options as the ones available when creating a list from scratch.
When you’re ready, run the following command:
Add-SPOListDesign -Title "Operations Asset Management" -Description "Asset management list for Operations projects"
-SiteScripts "[Site Script ID]"-ListColor BluePurple -ListIcon Clipboardlist
-Thumbnail "https://[tenant-name.sharepoint.com/sites/Templates/Shared%20Documents/OperationsListThumbnail.jpg"
Our new template should now be available for our users to start creating lists with. You can check this by creating a new list yourself on the same site as you created your initial list design. You will see template appear under the ‘From your organization’ tab of the ‘Create a list’ popup:

Step 3 – Set who can use a template
Currently, in our organization, we only have one list template available, but if we had many, we may want to limit the number of templates our users must choose from when creating a new list. To do this, make the lists available to certain M365 groups within our organization. To do this we will need two things:
- The list design ID
- The M365 group mail addresses
The list design ID
This was generated when we created the new list design in Step 2 – Creating a list template. We can also retrieve it by using the following command that lists all the current list designs on our tenant:
Get-SPOListDesignThe M365 group mail addresses
You will need to determine which M365groups you want to share the list with and copy their mail addresses, in our case, we are sharing only to the Operations department so the mail address will look something like this: Operations@[tenant-name].onmicrosoft.com
It’s also possible to share directly to individual users but we recommend against using this approach.
Scoping the list design permissions
Now that we know which list design we want to limit access to and who we want to have access, we can use the following command:
Grant-SPOSiteDesignRights -Identity [List Design ID] -Principals Operations@[tenant-name].onmicrosoft.com -Rights ViewNow only members of the Operations department will be able to access our Operations Asset Management list template.
Final Considerations
Template cleanup
When have multiple templates available within your organization, it’s a good idea to clear out old ones that are no longer in use. There are two areas that you will need to do this, in the list designs and the site designs. You can do this with the following commands:
Remove-SPOListDesign -Identity[List Design ID]

Remove-SPOSiteScript -Identity[Site Script ID]
Template Updates
As the templates start being used more frequently, you may want to update them to line up with user needs more closely. To do this, you will need to follow these steps:
1. Remove the current list design
2. Update your list that you based your initial design on and extract it to a variable
3. Update the original site script with the Set-SPOSiteScript command
4. Create a new List Design and Scope the access as required
Education
Make sure that your users are aware of the templates that are available them and, from a governance perspective, they are not customizing the list after they have been implemented. Rather have the feedback to you so you can update the templates available.
Bonus: Document Library Templates
Microsoft has extended the ability of templates to SharePoint document libraries.
How can you use them?
When you are creating a new library on your site, you now have 3 options as to how you want to create your library:
- Blank Library – this is a standard SharePoint document library with no additional columns or configuration.
- From Existing Library – Create a new library based on an existing library that you have customized.
- Templates – A selection of Microsoft provided templates that include metadata and Power Automate integrated workflows.

At the time of writing, it’s not possible to create custom templates for SharePoint libraries in the same way as Microsoft Lists.


