


This article is based on João Ferreira’s excellent explanation of how to copy pages between SharePoint sites using Microsoft Lists and Power Automate. João's content is great, follow him here!
We've tried it out and it works well, but we’ve made a few tweaks to the solution to streamline the process. Let's jump right into preparing your site pages library for migration, creating your flow, and post migration considerations.
1 - Requirements
Licensing
- SharePoint - Any license that includes a SharePoint P1 or P2.
- Power Automate – A free version of Power Automate as there are no premium connectors in this solution.
Roles
- SharePoint site member – For the source and destination sites, you will need to be a member of the site and/or M365 Group.
2 - Prepare your Site Pages library
Adding metadata to the source site pages library enables you to review and select the pages you want to migrate. In this example, the following Yes/No columns will be added:
- Migrate – Whether or not a page should be migrated.
- Delete from Source – Once migrated, should the page be deleted from the source?

3 - Create your Power Automate Flow
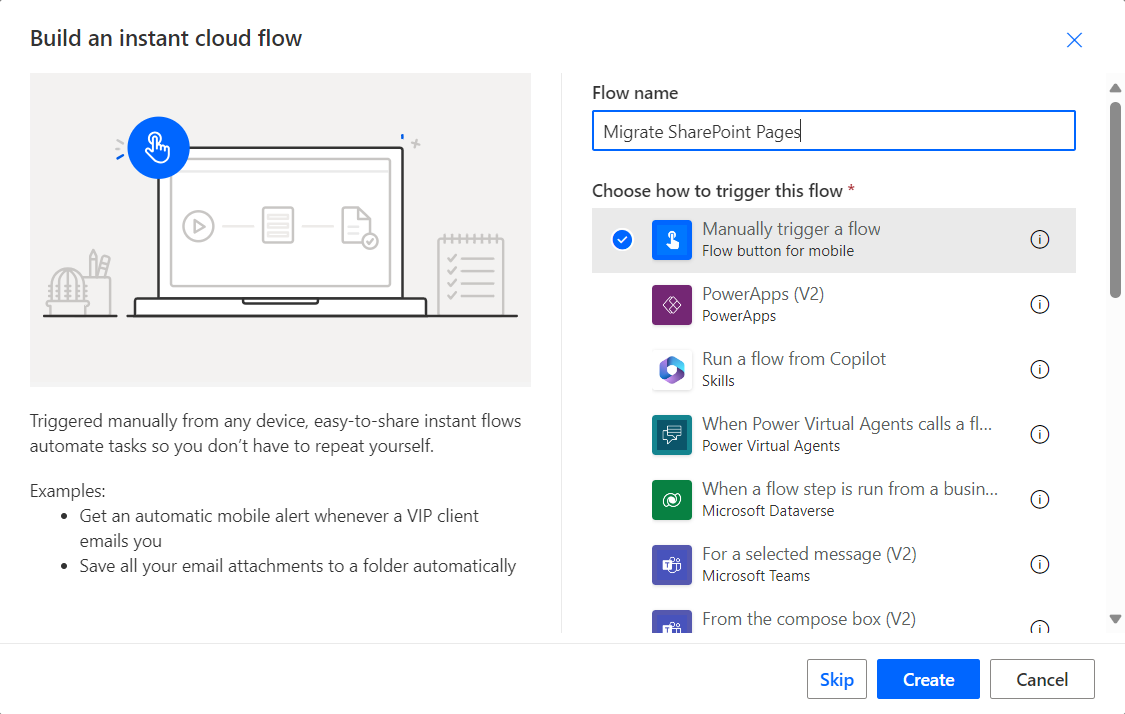
Step 1: Create an Instant cloud flow
In Power Automate, create a new Instant cloud flow and give it a name.
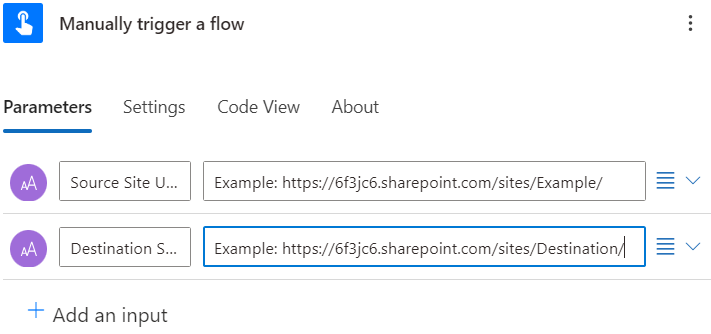
Step 2: Add Source and Destination inputs
Add a text input for the source and destination site URLs for the page migration:
Step 3: Get Pages for Migration
Add a new step with the SharePoint connector for ‘Get items’ and configure the following parameters:
- Site Address – Use the trigger value for the ‘Source Site URL’.
- List Name – Add the custom value for ‘Site Pages’.
- Filter Query – Filter the results with Migrate eq ‘1’.
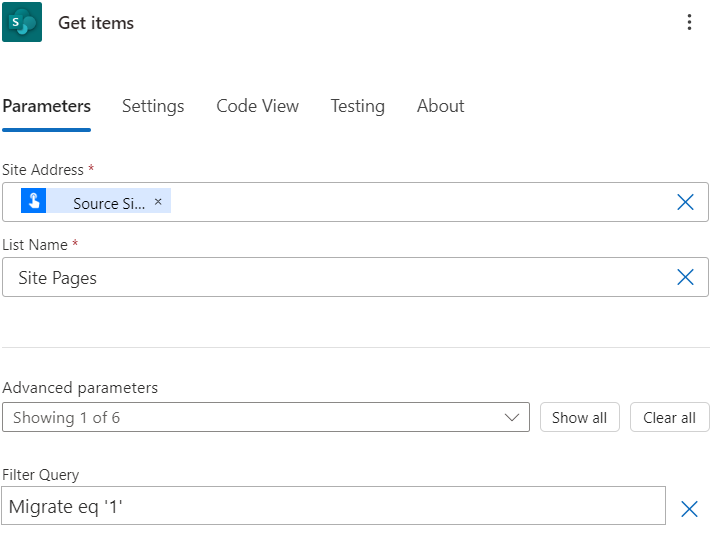
This will retrieve all your pages from your source site that have been marked for migration.
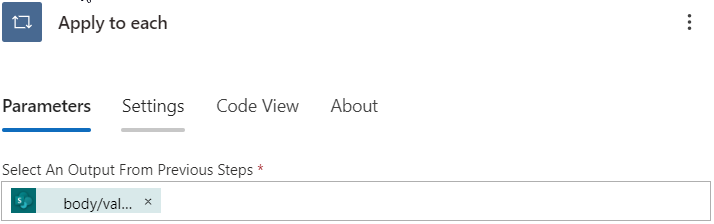
Step 4: Apply to each
Add an ‘Apply to each’ step and add the ‘body/value’ from the ‘Get items’ step:
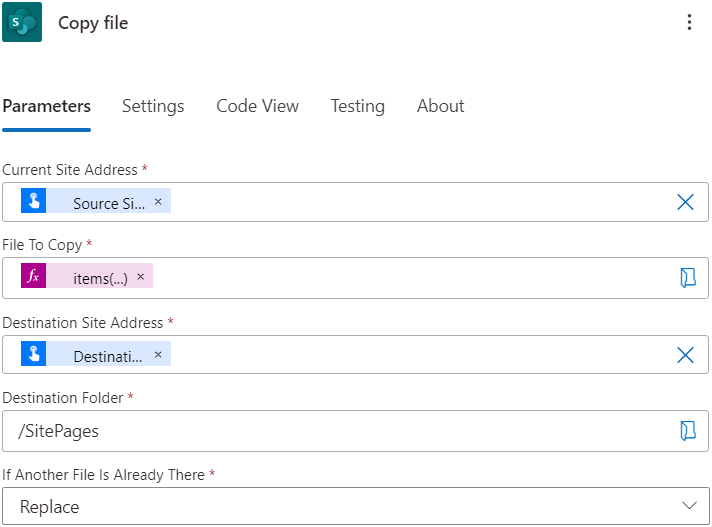
Step 5: Copy file
Inside the ‘Apply to each’ step, add the ‘Copy file’ SharePoint connector option and configure the following parameters:
- Current Site Address – Use the trigger value’s ‘Source Site URL’.
- File to Copy – Create the following expression items('Apply_to_each')?['{FullPath}'] where items('Apply_to_each') is based off of the name you have given your ‘Apply to each’ step.
- Destination Site Address – Use the trigger value’s ‘Destination Site URL’.
- Destination Folder – Enter ‘/SitePages’.
- If another file is already there – Chose ‘Copy with a new name’, ‘Fail this action’, or ‘Replace’.
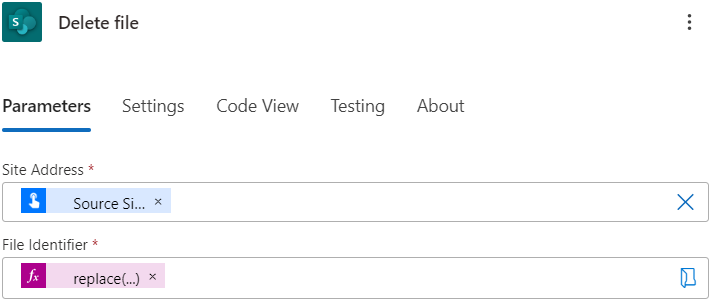
Step 6: Delete source page
Add a new step, inside the ‘Apply to each’ control and below the ‘Copy file’ step, for a ‘Condition’ control to determine if the source page will be deleted or not after the copy action has been completed.
The parameters used are:
items('Apply_to_each')?['DeletedfromSource']eq ‘true’

In the ‘True’ branch, insert the ‘Delete file’ step with the following parameters:
- Site Address – Use the trigger value’s ‘Source Site URL’
- File Identifier – Create the following expression replace(concat('/',items('Apply_to_each')?['{FullPath}']),'/','$252f') where items('Apply_to_each') is based off of the name you have given your ‘Apply to each’ step.
Step 7: Test
This step is for the finished product as well as throughout your automation building process, test your flow to ensure the results are what you expect.
Flow overview
Here is an overview of what your completed flow will look like:

4 - Post migration considerations
Once you have migrated your pages, you will need to look at the following:
- Page Links – Whilst the page is copied to the destination site, page links are not updated. Any links pointing to resources on your source site will remain the same.
- Images – Similarly to the links, images, such as banner images and images embedded in your text areas, will refence the images uploaded to your source site.
- Access – Related to the other points, you will need to consider what happens to the access for the source site.
- Navigation – Pages will not be automatically listed in the destination site’s navigation.
5 - Conclusion
This solution will be most effective when migrating a large quantity of pages within your tenant.
Bonus: Org-Wide Asset library
If you want to avoid the hassle of migrating and replacing images in your pages, you should look at our blog on org-wide asset libraries, Improve M365 governance with an org-wide asset library.


