SharePoint is great for collaboration and document management, but without a well-organised site structure, it can quickly become difficult to navigate. In this guide, we'll explore the best practices for creating an effective SharePoint team site structure. This includes tips for:
- Organising content
- Creating intuitive navigation
- Optimising search functionality
Whether you're new to SharePoint or looking to improve your existing site, these tips will help you create a more efficient and user-friendly experience for your team.
Understand your team site goals
Before diving into the technical details of SharePoint structure, it's important to take a step back and understand your team's goals for using the platform. Are you using SharePoint for document management, active project collaboration, or archiving? What types of content will be stored on the site, and who will be accessing it?
Once you have a clear understanding of your team's needs and goals, you can start to plan out a site structure tailored to their specific requirements and make it easy for your users to find and access the information they need. It is a good idea to organise your site into logical sections or areas suited to how people might use the different types of content you plan to serve. For example, when creating an HR team site, you might have an HR resources section containing documents covering recruitment, onboarding, training, and policies and procedures, and separate sections for performance management, employee records, and compensation and benefits.
Within each section, you can create document libraries, lists and pages to further organise and manage your content. It's also important to establish clear permissions and access levels for each section and content type, to ensure that only authorised users can view and edit sensitive information.
Associate to the relevant hub
When creating a new SharePoint site, it can be tempting to simply create it as a standalone site without considering its relationship to other sites and content. However, this can lead to a disjointed and confusing broader organisational structure that makes it difficult for users to find what they need. When it comes to making your site useful, one of the most important best practices is to associate your site with a relevant hub.
A hub site is a designated team site which serves as a parent for a number of child/spoke sites. By associating your team site with a hub, you can take advantage of the hub's navigation, branding, and search capabilities, making it easier for users to find and access your content (and other content associated with the hub).
This means considering the content and purpose of your site and choosing a hub that aligns with it. For example, if your site is focused on HR policies and procedures, it would make sense to associate it with the HR hub. This will not only help users find your site more easily, but it will also ensure that your site is included in relevant searches and navigation menus.
Additionally, associating your site with a hub can help you stay connected with other related sites and content, making it easier to stay up to date with any changes or updates. If any organisational restructuring takes place, it’s also easy to associate the site with a different hub to immediately inherit the updated navigation.

Decide on the appropriate use of libraries vs folders
One of the most important decisions you’ll make when it comes to structuring your SharePoint site is whether to use libraries or folders to organise your documents.
Libraries are collections of files that share a common theme or purpose and importantly, they allow you to better organise your content with the following options:
- Metadata – You can customise the columns, create content types and tag your files to make them more searchable.
- Templates – You can create custom templates to start new documents at the library level
- Labels – Allows for a more granular level of control of the content being stored in the library. This doesn't negate the need to apply labels at the site level, instead, it enhances the level of control you have and can be used to classify specific content, help meet compliance regulations and with content lifecycle management.
Folders help to further organise documents inside a library. Their options are fairly limited and you can only configure them in the following two ways:
- By naming them – This is only useful if you’re manually navigating into a document library to find a file and doesn’t help if you’re using search
- By setting permissions – If you don’t want a selection of files in your library to have the same permissions as the rest, you can put them in a folder with a different set of permissions
Take a look here for more about the pros and cons of libraries and folders.
When deciding on the appropriate use of libraries and folders, it’s important to consider the size and complexity of your SharePoint site. If you have a very large number of documents to manage, it may be more efficient to create separate libraries for different types of documents. For example, you could create a library for contracts, a library for onboarding documents, and a library for HR policies. This will make it easier for users to find the documents they need and will also help with searchability and reduce the risk of document duplication.
Also, bear in mind that views only support a maximum of 5000 items, and that permissions cannot be managed granularly in libraries with more than 100,000 items.
On the other hand, if your SharePoint site is smaller and less complex, using folders within a single library may be sufficient. However, it’s important to keep in mind that having too many folders within a library can make it difficult to navigate and find specific documents. In general, it’s best to limit the number of folders within a library to no more than 20-30.
Keep your site structure shallow
When it comes to SharePoint site structure, less is often more. Limiting the number of levels in your site hierarchy means avoiding deep folder hierarchies that can be confusing and difficult to navigate. A good rule of thumb is to keep the structure to no more than three levels deep. This will also make it easier to manage permissions and ensure that users have access to the appropriate content. Ideally, you should not be setting permissions on any level deeper than libraries and lists. Folder-level permissions are generally a bad idea, with the exception of very specific tightly controlled scenarios where it cannot be avoided.
One way to achieve a shallow site structure is to use metadata and search functionality to categorise and locate content, rather than relying on a complex folder hierarchy. This allows for more flexibility and easier navigation, as users can search for specific keywords or filter by metadata tags. For example, you could use content types to tag documents with keywords like "Project name" or "HR department" to make them easily searchable.
It is also worth noting that best practice according to Microsoft is to avoid the use of subsites entirely and to only have a root site in a Site Collection and when more than one site is required, instead of using subsites you should use the hub and spoke model.
Take a look at SharePoint subsites are obsolete.
Keep your SharePoint site navigation simple
When it comes to structuring your SharePoint site, it is best to keep your navigation simple. A cluttered and confusing navigation can lead to frustration and decreased productivity for your users.
“Navigation” doesn’t only mean the navigation components within the site, but any functionality people use to explore a site’s content to find what they need.
Here are five steps you can take to keep your navigation simple:
- Use clear and concise labels for your site hierarchy - Organise your site content into categories that are easy to understand and navigate.
- Avoid using overly complex structures that may be difficult for users to navigate - make sure that your navigation is logical and intuitive and keep your sites shallow.
- Consider using a top-level navigation bar with drop-down menus - If properly structured, a drop-down menu or mega menu can greatly enhance navigation and help users quickly find the content they need.
- Consider the order in which you present your site hierarchy - Start with broad categories and then drill down to more specific subcategories. This can help users quickly identify where they need to go to find information.
- Regularly review and update your navigation – Make sure that your site remains relevant and easy to use.
Use content types or site columns to improve consistency
One of the key benefits of using SharePoint is the ability to create and manage different types of content. However, without a uniform approach to content creation, your site can quickly become cluttered and difficult to navigate.
By defining specific attributes for different types of content, you can ensure that all content of the same type is created with the same structure and metadata. This not only makes it easier to search and filter, but it also helps to maintain consistency across your sites.
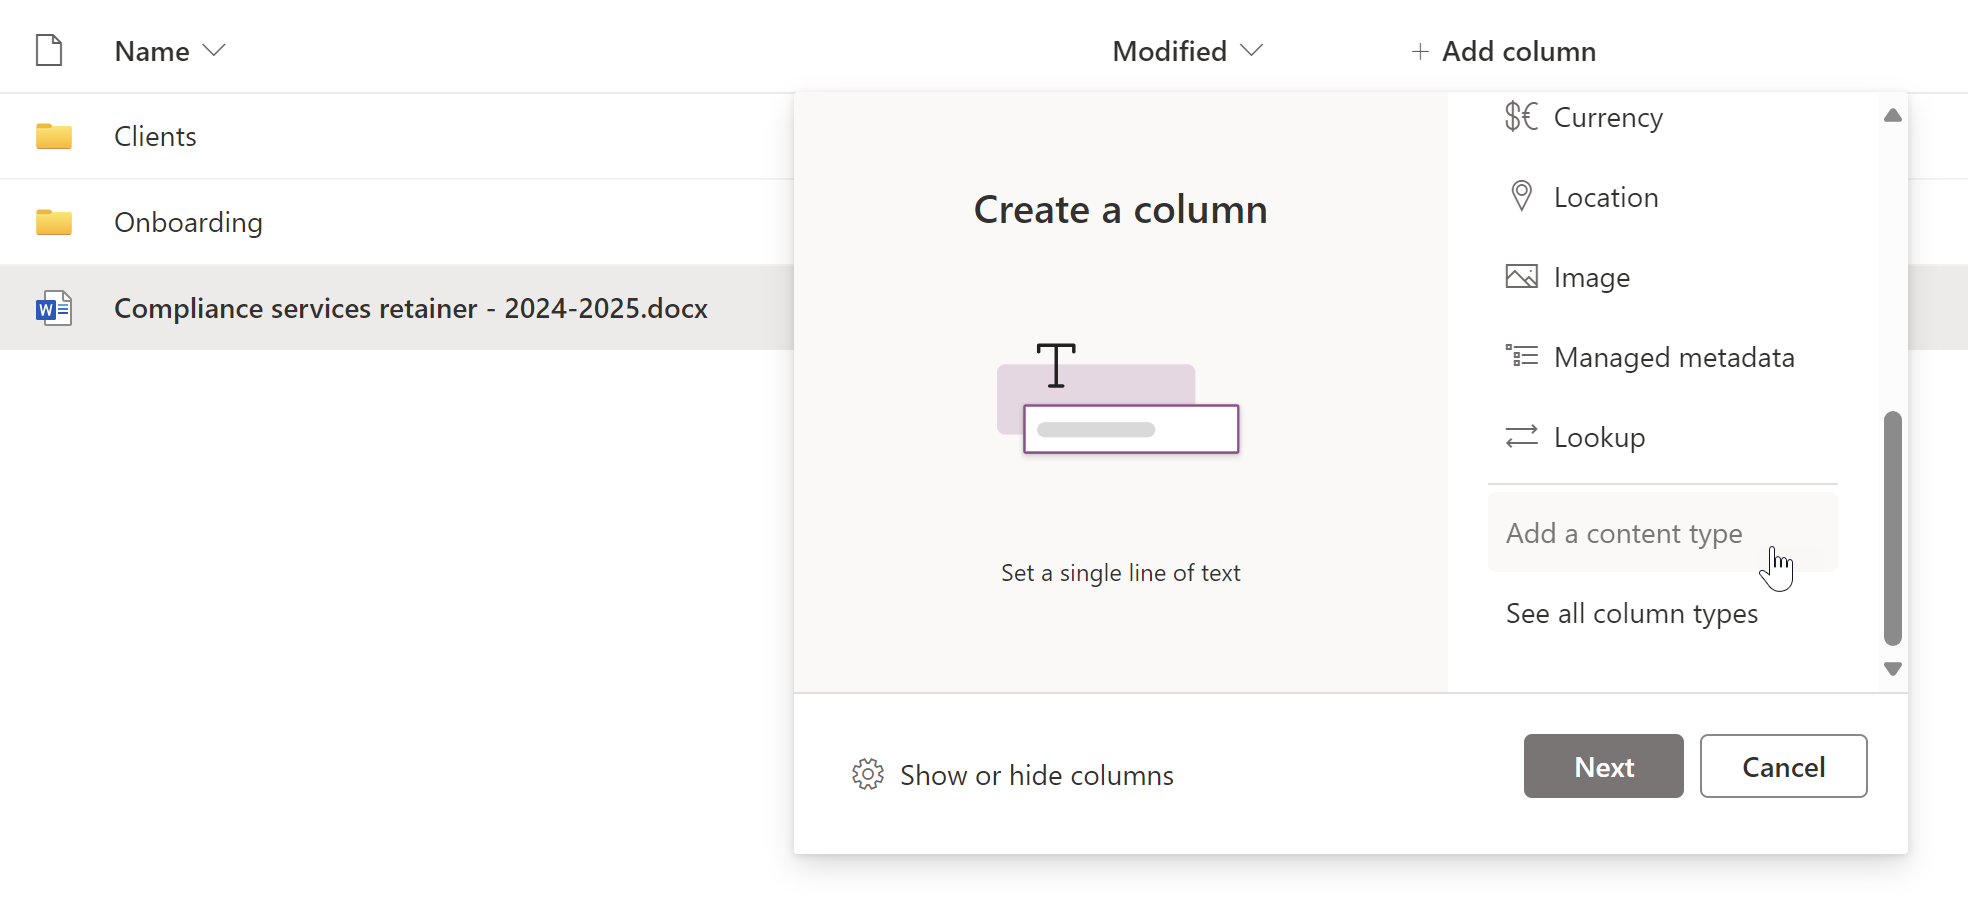
Content types are managed centrally in the Content type gallery in the SharePoint admin center, and site columns can be managed locally within a site by its owners.
Content types
If your organization has many project management sites, it makes sense to create a content type for project proposals that includes specific metadata fields for project name, budget, and timeline. This will help ensure that all project proposals across all project-related sites are created with the same information, making it easier to compare and evaluate them. Because content types are centrally created and maintained in the SharePoint admin center, all team (and communication) sites using them retain this consistency.
Once a content type has been created in the Content type gallery, it can be added to a list or library in a site using the +Add column > Add a content type menu.
In addition to improving consistency, using content types can also help with compliance and governance. By defining specific attributes for different types of content, you can ensure that sensitive information is properly labelled and protected. This can be especially important for industries with strict regulations, such as healthcare or finance.
Use permissions effectively
When it comes to SharePoint structure best practices, determining your permission requirements is a crucial step. This means deciding who will have access to what content and what actions they will be able to perform.
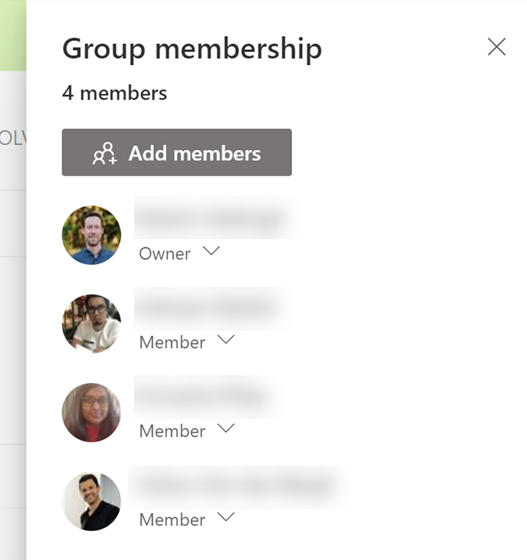
It’s important to clearly define the difference between ownership, membership and readership. Because Teams and SharePoint are designed to be fully collaborative or fully read-only by default, it takes a bit of effort to separate collaborative content (which should be editable by everyone) from publishing content (which should only be editable by some) within the same team site.
In these instances, you should proceed with caution and as a rule separate permissions only as far down as the library or list level, and in the very rarest of cases folder level.
If you’re not comfortable with granular permission management, the best thing to do is to use the standard owner and member management capabilities of the team site membership panel and to publish read-only content using a separate communication site.
It’s also important to regularly review and update permissions as needed, to ensure that they remain appropriate and up to date.
If you find permissions daunting (they can be!), read our ultimate guide to team site permissions.