If when you open the SharePoint admin center, you see the “Your storage is full” message, this is for you. Without optimisation, SharePoint storage costs can rapidly add up to significant amounts.
This guide outlines six proven methods to reclaim 10-30% of SharePoint storage without data loss. These methods have been tested by the SProbot team across various organizational environments and consistently deliver significant storage reduction.
The most effective ways to reclaim SharePoint storage are:
- Trim unwanted/unnecessary versions
- Find and remove ROT (Redundant, Obsolete, Trivial) content
- Identify and clean up unusually large files
- Clean up inactive sites
- Clear recycle bins (for short-term gains only)
- Implement retention policies to dispose of old content
1. Eliminate document version history bloat 📜
Version history represents the largest opportunity for storage optimization in most SharePoint environments. SharePoint Online stores up to 500 major versions of each document by default (this can be set up to 50 000), resulting in substantial storage consumption over time.
Storage impact examples
- On an average 10TB tenant, there are more than 2 million documents.
- In highly collaborative organizations where users constantly edit documents, version history typically accounts for 40-60% of total storage consumption for active files. In many instances, this can easily add up to 30% of the total storage on the tenant.
- The most storage is usually consumed by outlier documents with media embedded in them. A PowerPoint file with two 800MB high-resolution videos embedded in it has a single-version size of 1.6GB, but after being edited over a period of 2 years with small changes to text, it can grow to more than 500GB.

Implementation actions
Eliminating version bloat requires a three-step approach:
- Trim unnecessary older versions.
- Set future version limits to either a capped manual number, or automatic limits.
- Monitor growth and usage and adjust your approach accordingly.
Expected results
10-20% storage reduction after working through all sites.
Considerations
- Version limits must align with regulatory retention requirements. Collaborate with legal and compliance teams to determine appropriate version counts for different content types.
- Version trimming in SProbot frees up storage immediately by permanently deleting trimmed versions instead of sending them to the recycle bin
2. Identify and remove ROT content 📼
ROT content is Redundant, Outdated, and Trivial files that consume storage without providing business value. This content accumulates through normal business operations but requires systematic identification and removal.

Examples of Redundant content
- Multiple copies of identical presentations
- The same documents uploaded by different users
- Backup copies stored in active locations
Examples of Obsolete content
- Completed project documentation with no archival value
- Marketing materials for discontinued products
- Meeting recordings older than retention requirements
- Superseded policy documents and procedures
Examples of Trivial content
- Test sites like "Joe Sandbox 2024"
- Personal files mistakenly uploaded to team sites
- Screenshot collections and temporary files
- Draft content that was never finalized
Implementation actions
To identify and clean up ROT, you need to first find sites and files which meet the criteria above, then choose to either archive or delete them.
Redundant content
- Identify sites and teams which have the same name but different URLs, evaluate which is the original (or most relevant) by consulting with site owners, then archive or delete unwanted copies.
- Find files which have the same filename, determine which copies are the authoritative ones, and remove the unwanted duplicates.
Obsolete content
- Identify files which haven’t been updated for at least 1 or 2 years. Once file-level archiving is available in Microsoft 365 archive, you will be able to move individual files into more cost-effective cold storage. Until then, you can selectively delete files which truly aren't necessary anymore (possibly using a very cautious "older than" figure).
According to Microsoft, 95% of files which haven't been accessed for more than 2 years are unlikely to be used again.
Trivial content
- Find sites and teams created for test or sandbox purposes and evaluate whether they are still needed. Most tenants have several forgotten test or sandbox sites, and even though they may not consume a large amount of storage, every bit helps.
- Within sites, use AI to detect trivial files which are not aligned to the purpose of the site, or not work-related at all, for example holiday photos, illegal movie and series rips, etc.
Expected results
10-20% storage reduction plus improved search performance and content discoverability.
Considerations
Searching for duplicate files across an entire tenant requires extensive resources and may not be practical in many cases.
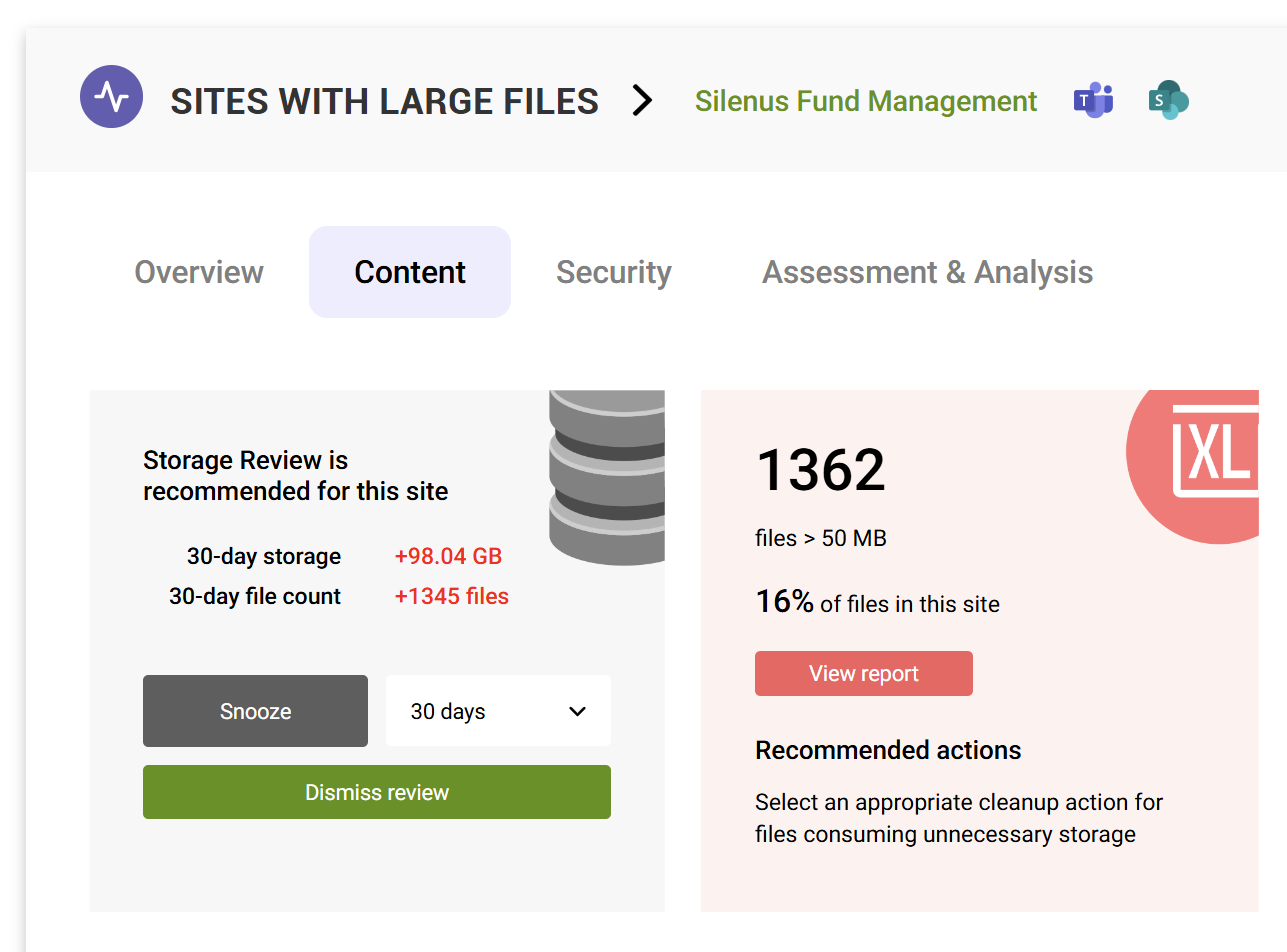
3. Improve large file management 🐘
End-users are usually unaware of the impact of the files they upload to SharePoint. Specifically, they don't realise that very large files have a significant impact on storage costs, and that these files often don't require the advanced collaborative functionality (versioning, co-authoring, automation) that SharePoint offers.
Large files in SharePoint often take the form of media and technical files.
Media files
- Uncompressed video content
- High-resolution images and graphics
- Audio recordings and presentations
- Marketing materials with embedded media, like PowerPoint decks
Technical files
- CAD drawings and engineering files
- ISO images
- Database backups and exports
- System documentation with screenshots
- Software installation packages
Implementation actions
Use reporting on files larger than 50MB to review results to determine whether to keep them in SharePoint, or move them to a simpler, more cost-effective storage location.
Expected results
3-7% storage reduction plus improved sync performance for document libraries.
Considerations
Storing or moving files classified as personal to OneDrive needs to be approached with caution to prevent business-relevant files from ending up in a location where they are not correctly permissioned and retained if a user leaves the organization.
4. Clean up inactive teams and sites 💤
Abandoned SharePoint sites consume storage indefinitely without providing business value. These sites are usually a result of completed projects, organizational changes, and employee departures.

Implementation actions
Manual option
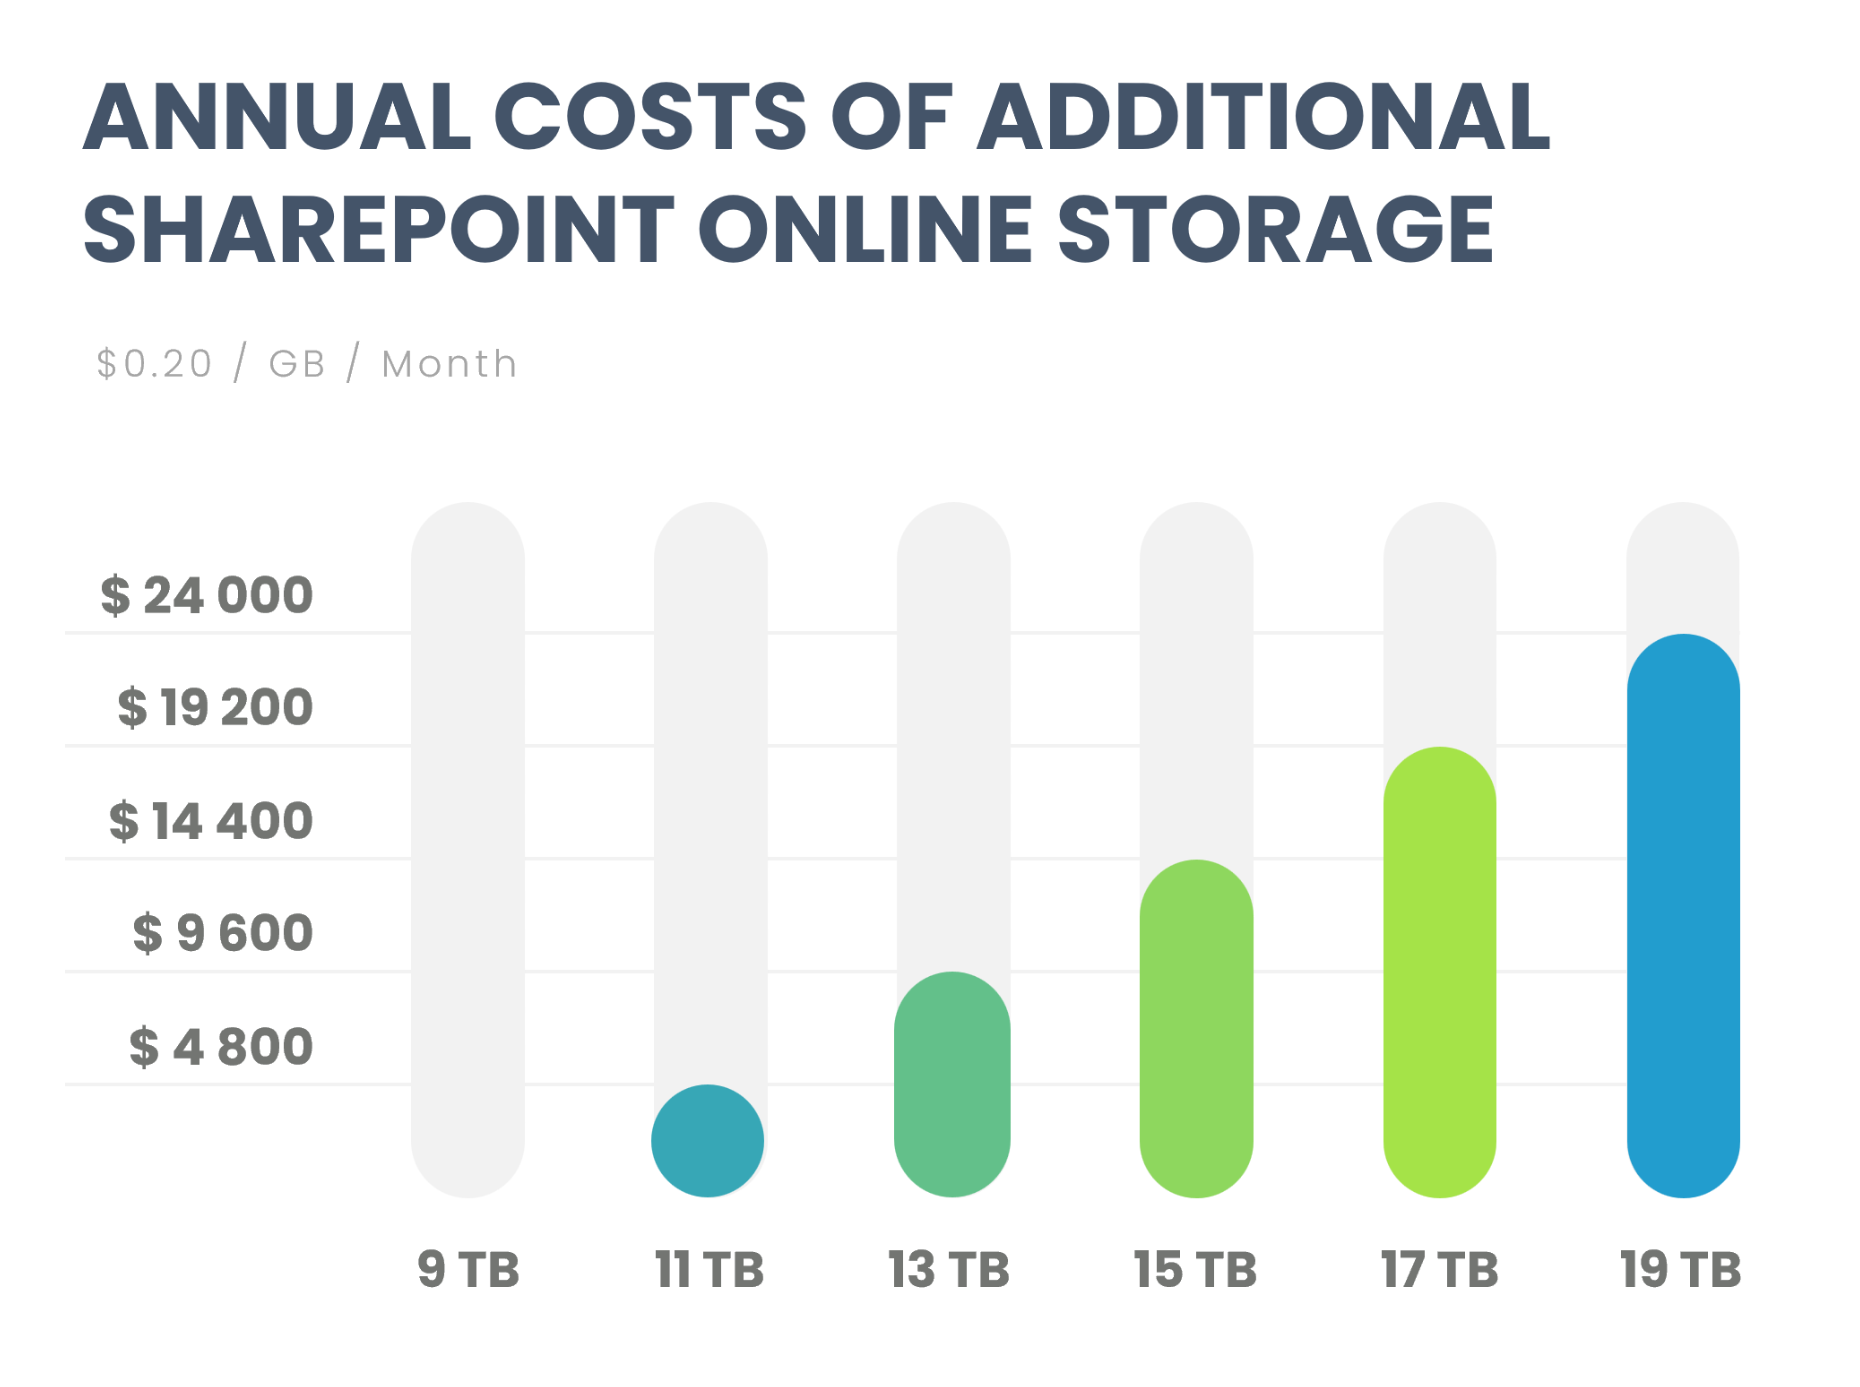
Find sites which have been inactive for at least 1 year (or longer if sensible). These sites can in most cases be directly archived without the risk of data loss, because they can easily be restored again. Storage costs for archived content are 75% lower than that of live SharePoint content.
Automated option
Automatically notify site owners when an inactivity threshold is reached by using SProbot’s inactive site cleanup or Site Lifecycle Management in SAM.
Expected results
5-10% storage reduction plus reduced administrative overhead and improved site discoverability.
Considerations
- Analysis: Generate comprehensive site usage reports including last login dates, file access patterns, and owner status. Analyse storage consumption relative to content value.
- Verification: Contact site owners to confirm abandonment status before taking action.
- Documentation: Record cleanup decisions for future reference.
- Caution: As a rule, archive rather than delete unless there is absolute certainty that the site does not contain any important content. Also, verify compliance requirements.
- Prevention: Implement lifecycle management policies for future site monitoring.
5. Recycle bin and second-stage cleanup 🗑️
SharePoint's two-stage recycle bin retains deleted content for extended periods, continuing to consume storage space against site quotas even when users have deleted unwanted content. This creates temporary hidden storage burden that administrators often overlook.
Recycle bin system overview
First-stage recycle bin
- Visible to site users after content deletion
- Retains content for 93 days by default
- Continues consuming storage against site quotas
- Accessible by site owners through site settings interface
Second-stage recycle bin
- Accessible only to site collection administrators
- Retains content if it is deleted from the first-stage bin
- Requires administrative access for cleanup
Implementation actions
Unfortunately clearing of recycle bins is not possible through the SharePoint admin center, so you need to do this via the site UI or PowerShell.
1 - Cautious option: Empty only the second-stage recycle bin to ensure that you’re not deleting content which users might still want to restore.
# Connect to the site
Connect-PnPOnline -Url "https://yourtenant.sharepoint.com/sites/yoursite" -Interactive
# Clear only second-stage recycle bin
Clear-PnPRecycleBinItem -SecondStage -Force
2 - Aggressive option: Empty both first and second-stage recycle bins.
# Connect to the site
Connect-PnPOnline -Url "https://yourtenant.sharepoint.com/sites/yoursite" -Interactive
# Clear all items from both recycle bins
Clear-PnPRecycleBinItem -All -Force
Expected results
Immediate storage reduction impact following cleanup completion.
Considerations
This method only accelerates the storage gain process, if you don’t delete items this way, they will automatically free up space after their bin retention period ends anyway.
6. Implement disposal via retention policy ♻️
Retention policies are a powerful way to prevent storage from being indefinitely consumed, and because they are automated, reduce administrative overhead.
Due to how they are generally configured with a broad scope affecting large swathes of sites and can be complex to understand, they can potentially result in unwanted removals if care is not taken. For this reason, retention policies are best used for long-term disposal (measured in years rather than months) rather than short-term content cleanup.
Background: Learn about retention for SharePoint and OneDrive

Implementation actions
It is recommended that you review Microsoft’s guidance around retention and disposal or consult with a Purview specialist before implementation labels and policies, but the broad steps for implementation are typically:
- Business policy definition: In purely business terms, define retention schedules based on how long different departments are required by regulatory bodies to keep content. In some cases, this might be driven by practical rather than regulatory considerations.
- Technical planning: Map out the various labels and policies to be created to retain and dispose of content both at site and individual file level. Use Microsoft’s retention Flowchart to check your logic.
- Testing: Thorough testing with shortened periods and clearly defined scenarios is necessary to understand the impact of various labels and policies on each other and the end-results. Do not underestimate the possibility for misunderstanding and conflicting rules to affect the outcomes you might expect to be obvious (see the flowchart above).
- User awareness: Conduct training and set up easy-to-understand guidance material which makes all users aware of the policy applicable to their area of the business.
- Deployment: More so than many other systems and processes, only deploy once you are 100% satisfied that everyone understands the outcomes
Considerations
It is important to understand that retention policies by their very nature (and name, of course!) are designed to retain first and then dispose. This means that implementation might in some instances result in more storage consumption because content is retained, rather than being easily disposed of by users who aren’t aware of the policies.
FAQs
- Is there a storage reporting tool I can use for a unified view of cleanup activities? SProbot's Health Check provides a single port of call for metrics across storage, security, content and activity.
- How quickly will storage optimization methods show results?
- Version history cleanup provides immediate results within hours of implementation.
- ROT content removal requires 2-4 weeks for analysis and approval processes.
- Abandoned site cleanup typically takes 4-6 weeks depending on the number of sites requiring review.
- What safeguards prevent accidental deletion of important content? Implement staged approaches with stakeholder approval to minimize the risk of accidental deletion. In case things do go wrong, SharePoint's recycle bin provides a 93-day recovery window for recently deleted content, but consider rather archiving high-value content to Microsoft 365 Archive (at+-25% of the cost of SharePoint storage) instead of deleting it.
- What ongoing maintenance is required for these optimizations? Establish quarterly comprehensive storage reviews with monthly monitoring of version history and large files. Automated cleanup of inactive sites (and retention policies for some categories of content) can reduce the manual effort involved substantially.
- How do archiving and deletion approaches differ? Archiving moves content to cold storage within Microsoft 365 archive, which is inaccessible to end-users but still accessible to SharePoint admins and eDiscovery. Deletion permanently removes content after recycle bin retention periods expire. Selection depends on business value assessment and regulatory requirements.
In conclusion
Storage optimization requires systematic implementation and ongoing governance rather than one-time cleanup activities. The methods outlined here provide immediate storage reclamation while establishing processes that prevent unnecessarily increasing storage use in future.